Two patches with the same design can behave completely differently depending on what is on the back. The backing decides how the patch goes on, how permanent it is, and whether you can move it later. Verra offers four backings: sew-on, iron-on, velcro (hook and loop) and adhesive.
The four backings at a glance
| Backing | How it attaches | Best for |
|---|---|---|
| Sew-on | No backing material; the plain back is stitched onto the fabric | Jackets, uniforms and anything worn and washed often |
| Iron-on | A heat-activated glue film, pressed on with a household iron | Quick, no-sew application on everyday fabric |
| Velcro (hook and loop) | Hook side on the patch, loop panel on the garment or bag | Tactical gear and bags where you want to swap patches |
| Adhesive (peel and stick) | A sticky back under a paper liner | One-off events and short-term use |
Sew-on: the most permanent choice
A sew-on patch has no backing material at all. The back of the stitching is sewn straight onto the garment, usually through the merrowed border. It is the most permanent option and holds up to heavy daily wear, which is why it is the usual choice for uniforms, club jackets and workwear.
The trade-off is time: it has to be sewn by hand or machine. If you want a patch that stays on for the life of the garment, that is worth it.
Iron-on: no sewing needed
An iron-on patch has a heat-activated glue film across the whole back. Press it with a household iron and the glue melts into the fabric. It is the fastest way to attach a patch with no needle involved.
If an edge ever lifts, re-press it for a few seconds with a cloth on top; that usually reseats the adhesive. For garments that are washed constantly, many people iron the patch on to place it and then add a few stitches around the edge. See our custom iron-on patches page for the full step-by-step guide.
Velcro: swap patches whenever you like
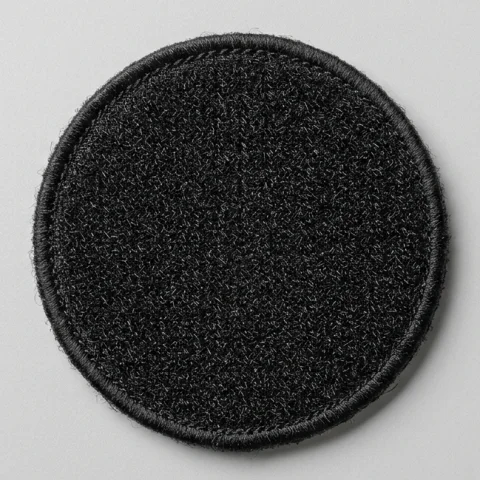
With a velcro (hook and loop) backing, the stiff hook side is sewn onto the patch. It grips a soft loop panel, so the patch can move between bags, jackets and gear in seconds. That is why military, police and tactical patches almost always use it.
One thing to check before you order: velcro only holds on a loop surface. Tactical gear usually has loop panels built in; a plain fabric garment needs a loop panel sewn on first. Keep the hook side free of lint and thread, which weakens the hold. More on our custom velcro patches and military and tactical patches pages.
Adhesive: peel and stick for events
An adhesive patch has a sticky layer under a paper liner. Peel the liner off and press the patch on. It is the simplest option for one-day events, giveaways and temporary use, but it is not meant to survive washing or years of wear.
Which backing for which garment?
- Jackets, uniforms, workwear: sew-on, for permanence.
- Tactical vests, range bags, plate carriers: velcro, so patches can be swapped.
- Cotton tees, denim, twill caps: iron-on for a fast, no-sew finish.
- Event badges and giveaways: adhesive.
Which patch types offer which backings?
Not every backing suits every material. Embroidered patches can have any of the four. PVC patches and biker patches come sew-on or velcro. Most other types, including woven, chenille and leather, come sew-on, velcro or adhesive. Each patch page lists exactly which backings it offers, with photos of each.
Not sure? Tell us what the patch is going on and we will recommend a backing with your free quote. Nothing is made until you approve your digital proof.
How to apply each backing
Sew-on
- Position the patch. Lay it where you want it and check the placement from a step back before you commit.
- Hold it in place with pins or a few temporary basting stitches so it cannot shift while you sew.
- Stitch around the edge with thread that matches the border, sewing all the way around and through the garment fabric.
- Finish the thread: knot it on the inside, trim the ends and remove the pins.
Iron-on
- Check the garment. Read the care label and only use heat on fabric that is safe to iron; skip anything marked do-not-iron. Iron the spot flat first.
- Position the patch adhesive side down, exactly where you want it, before any heat touches it.
- Press with heat: cover the patch with a thin cloth and press firmly and evenly, using the temperature and time on the instructions supplied with your patch.
- Let it cool undisturbed so the adhesive can set.
- Check the edges and re-press any that lift.
Velcro
- Check the receiving surface: the patch carries the hook side and needs a loop surface to grip.
- Attach a loop panel if your item has none, by sewing it where the patch should sit.
- Press the patch on firmly so the hooks grip, and peel it off whenever you want to move it.
Adhesive
- Prepare the surface: clean and dry, with no dust, lint or oil.
- Position, then peel and press from the centre out to the edges.
- Hold it for a few moments so it sits flat, then check the edges are down.
Backing questions
Which backing is the most permanent?
Sew-on. It holds up to heavy daily wear and repeated washing.
Can I move a patch between bags or jackets?
Yes, with velcro. Each item just needs a loop panel for the patch to grip.
Can I iron a patch onto any fabric?
Only onto fabric that can take an iron's heat. If the care label says do not iron, choose sew-on or velcro instead.
I'm not sure which backing my order has.
Check your order confirmation or approved proof, or contact us before you apply it.